
AGING-IN-PLACE GUIDE
In March of 2023, my grandmother suffered a stroke. The recovery that followed was slow and hard-won, sustained largely by her own determination and my mother's care. She regained a great deal, but came home permanently changed. With that came an unavoidable realization: that the family home we lived in was not built for the way she now needed to move through it.
There were impediments everywhere. Stairs awaited at the front door, the garage and even at the living room, while the entire main level had no shower or bedroom. We pieced together a series of makeshift responses: a chair lift, a steep aluminum ramp at the entry, a bathtub converted to a roll-in shower, portable plastic grab bar equipment. None of it ever felt like home, and it certainly didn't look like it either.
That experience led us to a conclusion we were reluctant to reach. We had to leave our home behind for a new one, designed from the ground up with accessibility as a founding principle rather than an afterthought. The result is currently under construction, and this guide is a record of everything we learned along the way.


Plan to have all spaces for living on a Single Story


The Samuel family representing for their favorite architecture firm


If not possible, consider accessible Vertical Circulation
Zero-threshold Entries ease the way for wheels and feet
Well-considered Clearances make every movement easier
Smart Systems support comfort, safety, and health
Every Room has its own accessibility needs
"The further we got into designing for accessibility, the more we found ourselves simply designing a better house...Easier, after all, is just easier."


Why designing for tomorrow makes a better home today.
This guide covers aging-in-place design across a range of scales and scenarios, from small decisions that quietly expand a home's flexibility to full ground-up design, with a focus on making accessible design feel cohesive and beautiful rather than clinical or bolted on. The underlying belief, borne out at every turn in our own process, is that a home designed with the future in mind is simply a better home today. We know firsthand how hard it is to live in a space that works against you, and we share this in the hope that fewer people have to. If you're navigating something similar, or just want to think through what any of this might mean for your own home, we'd love to hear from you.
A note on terminology: "Aging in place" has become the common shorthand for this category of design, and we'll use it throughout. But the principles apply well beyond older adults, to anyone recovering from an injury, living with a disability, or simply wanting a home that's easier to live in. The phrase points to a goal, not an audience.
THE STRATEGIC QUESTION
Can you live on one floor?
Before you think about any room, any finish, any fixture, there's one question worth asking first: can someone live entirely on the main level of this home?
That means sleeping, bathing, doing laundry, cooking, and spending time with the people you love, all of it accessible without the stairs. It sounds simple. In practice, most homes don't quite get there, and the gap is usually in the details.
Three things have to exist on the main level:
A bedroom or a room that could become one
A full bathroom
Laundry
Today's home office with a closet and a window is tomorrow's primary bedroom if the plan accounts for it. Laundry on the main level is one of the most commonly overlooked details in a renovation and one of the easiest to plan for when the walls are open.
Getting on and off that floor matters as much as what's on it. A main floor with everything you need is still a problem if it takes three steps to reach the front door. How someone moves from outside to inside, and back again, is part of the same question.
The systems that run the home follow the same logic. If the electrical panel, the mechanical equipment, or the primary storage lives on another floor, the home isn't fully independent on the main level. The goal is a home that doesn't require asking someone else to manage it. That's what independence looks like in practice.
If all of this exists on the main level, the rest of this guide is about making that floor work as well as possible. If it doesn't, the design problem starts with vertical circulation, and that's where the next section begins.
MOVING BETWEEN FLOORS
When single-floor living isn't possible, the question becomes how to move between levels without depending on a staircase. There are three design responses, and they differ in how much planning they require, how well they integrate into the home, and how much flexibility they preserve for the future.
Platform lifts
For most homes, a platform lift is the default solution. It requires structural and electrical planning but no shaft, and that distinction matters. A platform lift can be installed without affecting the structure of the floors above and below. That's the difference between a renovation and a construction project.
A well-finished platform lift can sit in the corner of a stair hall, clad in the same materials as the surrounding space. Most people picture a clinical metal box when they hear the word lift. A thoughtfully designed one reads as an intentional architectural element. Savaria makes well-regarded residential units worth looking at early in the process.
The most important move is roughing in the structural support and electrical during any renovation, even if the unit itself comes later. Rough-in locks in the location and the infrastructure without committing to the installation. It's the minimum investment that keeps the option alive. A platform lift added to a finished stair hall without that prior planning often ends up in the wrong location, or requires reopening walls to run electrical. The lift is simple. The coordination is where it goes wrong.
Residential elevators
An elevator is the right solution when the vertical travel between floors exceeds what a platform lift can handle, typically in a building taller than two stories. It requires a shaft, usually around four feet by four feet, stacked floor to floor. That's smaller than most people imagine. The footprint fits comfortably within a closet. The challenge is finding a location that works on every floor at the same time, which is significantly harder in a finished home than it appears on a plan.
Shaft location touches structure, load paths, floor framing, and mechanical and electrical systems that are already competing for the same space. Getting it right requires someone who can see all of those constraints at once, which is why it tends to be one of the first conversations worth having with an architect.
The stacking closet strategy is worth understanding early. Align closets floor to floor and you have a shaft location that costs nothing to preserve, and a great deal to create after the fact. Cutting a shaft into a finished home means opening floors, ceilings, and walls on every level it passes through. Preserving the location before the home is built around it avoids all of that.
In new construction, marking the elevator location on a plan takes minutes. Undoing the decision not to mark it takes weeks of construction. Few decisions in this guide have a more asymmetric cost-to-benefit ratio.
Stair lifts
A stair lift is a retrofit solution. It works with an existing staircase without structural work, electrical rough-in, or coordination between trades. That's also what limits it. It works around the problem rather than solving it, and unlike a platform lift that can be finished to read as part of the architecture, a stair lift is difficult to make look intentional. The rail, the seat, and the mechanical components are visible and present whether the lift is in use or not.
It's the right answer when planning didn't happen earlier or when options are genuinely limited. It solves the problem reliably. It just announces itself doing it.
One thing worth knowing before the decision is made: a stair lift on a curved or switchback stair requires a rail custom-fabricated to the exact geometry of that staircase, measured, manufactured, and delivered on a longer lead time and at significantly higher cost than a straight run. If there's any chance a stair lift is in the future, a straight stair run is worth designing for now.
📸 [SRS PROJECT] Cross House diagram — platform lift installation detail. (related to above)
ENTRIES AND APPROACH
Getting into a home is the first thing a person does and the last thing most renovation plans think carefully about. The approach, the path, the entry, and the threshold are a sequence, and each one either supports or undermines everything that follows.
The Zero-Step Entry
The goal for any home is at least one entry that doesn't require navigating a step to reach it. Ideally the primary entry. Steps are the single most common barrier to independent access, and a well-designed zero-step entry removes that problem entirely without announcing itself as an accommodation. It just looks like a well-designed home.
What that means in practice is a front door threshold that sits at the same elevation as the exterior grade. It sounds straightforward. It's one of the most commonly done wrong details in residential construction. The threshold is where three systems meet: structure, waterproofing, and finish. Each trade tends to assume the coordination is someone else's responsibility. Without explicit sequencing, each one does their part correctly in isolation and the assembly fails.
The details that make it work:
Drainage slopes away from the threshold
Correct flashing and door sill details
Trench drains where grade is tight
Get it wrong and you have a threshold that looks flush but allows water in, which is expensive to fix in finished work.
Removing the step also means the threshold has to work harder to keep weather out. Door thresholds, brush seals, weatherstripping, and mortise-style door bottom seals are what stand between the interior and the elements when the floor elevation is continuous. Pemko makes well-regarded options across all of these. Where sealing alone isn't enough, a linear drain with correct slope handles what gets past.
One of the quieter benefits of a zero-step entry is what it allows on the design side. Running a single floor material continuously through the threshold, tile, stone, ipe, cedar, or decking, dissolves the boundary between inside and outside in a way that reads as intentional and considered rather than purely functional.
Where a zero-step entry isn't achievable due to grade, a ramp is a valid and often elegant alternative. The standard that makes a ramp genuinely usable is a 1:12 slope, meaning one inch of rise for every twelve inches of run. A four-foot rise, common on Seattle homes with raised foundations, requires 48 feet of horizontal run. On a tight urban lot that's often the entire front yard. Ramps work well on larger lots. On denser sites the space simply isn't there, which is why the other options matter.
When grade makes both a zero-step entry and a ramp difficult, an exterior platform lift is worth considering. It solves the vertical change in a compact footprint using the same technology covered in the vertical circulation section. It's the solution that works where space is the constraint.
The Front Door
A covered entry matters more than most plans reflect. An uncovered threshold creates wet surfaces in bad weather, reduces visibility in low light, and creates the instinct to move quickly through the entry, which is when most falls happen. The cover isn't an aesthetic choice. It's the detail that makes everything else at the entry work reliably.
Door width is where most homes fall short without realizing it. A 36-inch door doesn't give you 36 inches of clear opening. Door thickness and hardware reduce the actual passage, often to 32 inches or less. Thirty-two inches is the minimum a standard wheelchair can pass through, but passing through and moving comfortably are different things. Thirty-six inches of clear width allows a wheelchair user to enter without precise alignment. Forty-two inches allows two people to move through together, or a person with a walker alongside someone helping them. The dimension is a proxy for dignity. It's the difference between managing and moving freely.
Lever hardware on every exterior door. A knob requires grip and rotation, two things that become genuinely difficult with arthritis, wet hands, or reduced hand strength. A lever operates with a closed fist or an elbow. Baldwin, Emtek, and Schlage all make hardware worth specifying.
Lighting
The approach to a home is where most exterior falls happen, not at the door but on the path to it. Uneven surfaces, grade changes, and wet conditions are all harder to navigate in low light. Lighting continuity from the driveway or garage to the entry means the path is as safe as the entry itself, not just the last few feet before the door.
Motion-sensing exterior lighting solves a sequencing problem. A switch at the door means the approach is dark until you're already there. Motion sensing means the light comes on before you need it. It also removes the need to find a switch in the dark, which matters more than it sounds at the end of a long day or in the middle of the night.

📸 [SRS PROJECT] Parkwood entry detail — zero-step entry showing drainage, threshold, and structural coordination.
HALLWAYS, DOORWAYS & STAIRS
How a home connects its rooms is as important as what's in them. Hallways, stairs, thresholds, and flooring are the infrastructure of daily movement, and they're almost always designed to minimum standards rather than good ones.
Hallways & Thresholds
Hallway width is one of those decisions that feels abstract during design and becomes very concrete the first time you try to move a piece of furniture, navigate with a stroller, or simply walk through your own home without the corridor feeling like a constraint. Thirty-six inches is the minimum worth designing for. At that width a wheelchair passes without wall contact and a mobility aid user can move freely rather than carefully. Forty-two inches is the more generous standard, and it shows. Wider hallways open up storage options along the wall and give a home a sense of openness that narrow corridors never have. The width isn't about wheelchairs specifically. It's about whether the home has enough room to live in comfortably, which matters long before a mobility aid enters the picture.
Getting this right costs nothing in new construction. In a finished home it means moving walls. Most existing homes fall short not because it's difficult to achieve but because it was never asked for at the design stage. Hallway widths are set during framing and rarely questioned until furniture moves in. By then the wall is finished on both sides.
Level changes and raised thresholds are worth eliminating wherever the plan allows. The reason they're dangerous isn't that they're large. It's that people stop seeing what they've always navigated around. Familiarity is part of the risk. A threshold that's been there for twenty years is invisible right up until it isn't. The ADA sets a useful benchmark: a maximum of half an inch in new construction, beveled above a quarter inch. Flush transitions remove the hazard rather than asking people to remember it's there.
Stairs
Stairs need continuous handrails on both sides, returned at the top and bottom. A handrail that ends at the newel post leaves someone unsupported at exactly the wrong moment, stepping onto or off the stair, which is when most stair falls happen. Returning the rail means support exists through the full transition. Continuous on both sides means a person can use whichever hand is stronger or more reliable on any given day.
Contrasting nosings on every stair tread. The leading edge is where depth perception matters most. In low light or with reduced vision, a uniform stair surface makes it genuinely difficult to judge where one tread ends and the next begins. A contrasting nosing gives the eye a reference point at exactly the moment it needs one. It's a finish decision that costs almost nothing and does real safety work.
Three-way switching on all hall and stair lighting. The terminology is confusing — three-way switching means two switches that operate the same light, one at each end of the hall or stair. A single switch means someone navigates in the dark from the wrong end. It's a small decision that gets made once and lives with the house forever. It also requires the electrician to know the plan before rough-in. Miss it then and adding it later means opening walls.
Flooring
Flooring throughout should prioritize traction and low reflectance. The right specification depends on the material:
Carpet: low pile
Wood: avoid glossy finishes
Tile: specify non-slip
High-gloss floors reflect light from above and create visual confusion about surface depth and wetness. An older eye has more difficulty filtering that reflected glare, which affects both balance and confidence. Reduced confidence in footing changes how people move — shorter steps, slower pace, more reliance on walls. The floor finish is doing more behavioral work than most people realize.
The bedroom-to-bathroom path deserves its own thought. It's traveled half-asleep, often without glasses, in low light, by someone whose balance is least reliable in the first minutes after waking. Every design friction on that path — a threshold, a turn, a poorly placed door — compounds at exactly the moment the person navigating it is least equipped to manage it. More on this in the bedroom section below.
BATHROOM
The bathroom is the highest priority room in this guide. It has the most decisions, the most coordination required, and the highest consequences for getting it wrong. Shower drainage, blocking placement, and toilet clearances all have to be resolved in the same framing window. These decisions don't queue up one after another. They happen together or they don't happen cleanly.
Layout
Start with the turning radius. Sixty inches is the diameter a wheelchair needs to complete a full turn, but it's also the space that makes caregiving possible. A bathroom planned without it works for one person moving independently. It stops working the moment a second person needs to be in the room helping. Plan for both from the start.
Where sixty inches isn't achievable, a T-shaped turn is a workable alternative. Two intersecting rectangles that allow a wheelchair to complete a three-point turn in a tighter footprint. Either way, the turning space has to be resolved before anything else is placed.
Toilet placement against a wall is a layout decision that determines whether grab bars can ever be installed correctly. It has to be coordinated with the shower position and the turning radius before framing closes. Get this wrong and no amount of finish work fixes it.
Non-slip tile throughout, wet-rated. The measure that matters is coefficient of friction. The standard for wet conditions is 0.60 or higher. It's a specification decision that costs nothing extra to get right and a great deal to retrofit if it was wrong from the start.
Vanity height at 34 inches rather than the standard 36. Standard vanity height is designed for standing use only. At 34 inches the vanity works seated or standing without compromise. Two inches is the difference between a bathroom that serves one posture and one that serves both.
Single-lever faucets throughout. Same reasoning as lever door hardware. One hand, a closed fist, or a wrist. No grip required.
Contrasting color at thresholds, edges, and fixtures. Depth perception and contrast sensitivity both decline with age. A white toilet against a white wall against a white floor gives the eye almost no information. Contrasting color at key points gives the eye a reference. It's a visibility decision, not an aesthetic one.
A window in the bathroom is worth planning for. Bathrooms are one of the higher-risk rooms in a home, and a windowless bathroom in an emergency becomes a wet, dark space with no natural reference point. Natural light aids visibility at the vanity and reduces reliance on artificial lighting alone. If the layout allows it, prioritize it.
Shower
The goal is a curbless shower, 36 by 60 inches minimum. A curb is the single most common trip hazard in a shower. Eliminating it removes the step that causes falls, allows wheelchair access, and reads as a design choice rather than an accommodation. Curbless showers are increasingly standard in well-designed bathrooms regardless of age or ability.
A linear drain makes the curbless detail clean. One direction of slope, more reliable waterproofing, and a cleaner visual. A tile inset on the drain cover reduces its presence further — the drain disappears into the floor. One tradeoff worth knowing: linear drains require more maintenance than standard center drains. It's worth understanding before specifying.
What most people don't realize is that a curbless shower requires planning at the subfloor level. Either dropping the concrete slab or sizing the joists to accommodate drainage. This is a structural and waterproofing decision made during framing, in the same window when blocking and toilet placement have to be right. It cannot be addressed during tile work.
For the bench, a built-in using Kerdi board substrate with a floating granite bracket is structurally sound, waterproof, and visually clean. In a smaller shower where a fixed bench would compromise the space, a fold-down bench is the right answer. Either way, location and size have to be decided before the shower is enclosed. A bench isn't just for someone who needs to sit. It's useful for shaving, keeping products within reach, or simply having a place to set things.
A handheld showerhead on a slide bar is one of the lowest-cost details in the bathroom and one of the highest-impact ones. A fixed showerhead requires standing in one position. A handheld is adjustable to any height, usable seated or standing, and useful for rinsing without getting fully wet.
Grab Bars
Blocking is the single most important decision in the bathroom, and it costs almost nothing. Three-quarter inch plywood backer in the shower surround and at the toilet, noted on the floor plan before framing closes. Blocking placement depends on toilet location and shower layout being resolved first. These three decisions are interdependent and have to be made together.
When bars are added later, Invisia makes grab bars designed to be indistinguishable from standard towel bars. Genuinely attractive hardware that happens to provide support when you need it. Moen Home Care and Kohler make bars in finishes that integrate with standard fixture lines.
The ADA dimensions are a useful planning benchmark. A 42-inch side bar and a 36-inch rear bar at the toilet. These dimensions reflect the actual mechanics of use. The side bar at 42 inches gives a full arm's reach for someone seated. The rear bar at 36 inches provides the push point for standing.
Toilet
Comfort height, 17 to 19 inches, over the standard 15. Standard toilet height loads the knees and requires significant quad strength to rise from. Comfort height reduces the angle at the knee and makes standing meaningfully easier. A small specification change with a significant difference over time.
Clear floor space of 18 inches minimum on one side, 36 inches preferred. The minimum allows a person to approach and transfer from a wheelchair. Thirty-six inches allows a caregiver to assist from the side. This is a layout decision that determines where the toilet sits relative to walls and fixtures before anything is built.
Bidet seats are worth taking seriously. Toto Washlet and Brondell are both well-regarded options. Bidet seats reduce the physical demands of toileting meaningfully — less reaching, less twisting, less reliance on grip and flexibility. For someone with limited mobility they extend independence in one of the most private aspects of daily life. Some toilets have bidet functionality built in, worth considering in new construction. For an existing toilet, a bidet seat is a straightforward retrofit.
THE BEDROOM
The bedroom is where the guide shifts from systems and coordination to something more personal. The decisions here are still design decisions, but they're also about how someone experiences a room they may spend significant time in. Start with layout and clearances, which are structural. Then the bed itself, which is a rough-in and furniture planning decision. Then the view and orientation, which have no wrong answer, only intentional ones. Then the path to the bathroom, which most bedroom layouts treat as leftover space.
Layout & Clearances
Thirty-six inches clear on at least three sides of the bed, forty-two inches on the primary approach side. Thirty-six inches is the minimum that allows a walker or wheelchair to move without precise navigation. Forty-two inches on the approach side allows a second person to assist without the room becoming difficult to move through.
Door swing is one of the most commonly missed details in bedroom layouts. A door that swings into the clear floor space around the bed, or into furniture placed along the wall, can't open fully. It eats into exactly the space a walker, wheelchair, or caregiver needs. It's cheap to catch on a plan and expensive to fix in a finished room.
The Bed
Most bedrooms are wired with outlets low on the wall, which is fine for a lamp and inaccessible for almost everything else. An adjustable base, a CPAP, a phone charger, and a reading light all need power at a height that doesn't require bending down or moving furniture to reach. Plan outlets on both sides of the bed at nightstand height so the room works regardless of how it's arranged.
Adjustable bases, Tempur-Pedic and Sleep Number are both worth considering, are functional without the clinical look and worth planning for seriously. The frame extends further than a standard bed, the head and foot articulate, and the power requirements are different from a standard setup. A room planned around a standard bed footprint may not accommodate one without losing clearance or rearranging furniture.
A hospital-grade bed is wider, heavier, and needs dedicated electrical. The wider footprint means the clearances planned around a standard bed may no longer be sufficient, and the electrical requirements need to be roughed in before walls are closed. Planning for this possibility now means the room can accommodate it without becoming a problem to solve under pressure.
The View from Bed
If someone is spending significant time in bed, recovering, resting, or simply living well into later life, what they look at becomes part of how they experience time. Orient the bed toward something worth seeing. A garden cultivated over decades. A window where grandchildren might play. A sky that changes through the day.
A skylight is worth serious consideration. It gives someone lying in bed a direct connection to the sky, light shifting through the morning, clouds moving in the afternoon, stars at night. It's one of the few architectural decisions that meaningfully improves the experience of a room for someone who can't easily leave it. Plan for a motorized blackout shade. Velux makes excellent integrated options. Without one the skylight becomes an alarm clock at dawn and the design works against itself. More on shading and light control in the orientation section below.
Ceiling detail reads differently from a bed than from standing. Most people design ceilings for a room they're moving through. A bedroom ceiling is designed for a room you're lying in. A well-chosen fixture or architectural detail matters more here than in almost any other room in the house.
Orientation & Light
Be intentional about which direction the bed faces and what that means seasonally. Do you want to wake with the sun or control it entirely? Neither is wrong. Neither should be accidental.
Motorized shades give full flexibility regardless of orientation. A shade you have to get up to close defeats the purpose in a room designed for rest. Motorized shades are operable from bed, schedulable, and remove the compromise between light control and convenience entirely. Lutron and Hunter Douglas both make systems worth specifying.
The Bedroom-to-Bathroom Path
The bedroom-to-bathroom path is the highest fall-risk route in the house. Not the stairs, not the bathroom itself. It's traveled in low light, half-asleep, often barefoot, multiple times a night. The shorter and more direct it is, the safer it is.
The clearance for this path is typically whatever space remains after furniture is placed. That means a door that swings into the route, a threshold at the bathroom entry, or a dresser that narrows the approach are all common outcomes of a path that was never drawn on the plan. None of them are unusual. They're the default when the path isn't treated as a design decision.
An ensuite eliminates most of those variables. If that's not possible, orient the bed toward the bathroom door and draw the path on the plan before the room is designed around it.
Motion-activated night lighting, low and warm. A light switch requires finding it in the dark. Motion activation removes that entirely. For a route traveled multiple times a night, that difference is the whole point.
THE KITCHEN
Most kitchens are designed for one posture. Standing at a standard height, moving through a familiar sequence of tasks. That works until it doesn't. Before any cabinet selection, any appliance choice, any hardware decision, start with one question: where is the primary work zone, and can someone use it seated or standing? The answer to that question determines counter height, knee space, and appliance placement. Everything else follows.
Work Surface & Counter Height
The standard counter height is 36 inches, designed for a standing adult of average height. One prep zone at 34 inches or lower changes who can use the kitchen independently. The 34-inch standard comes from wheelchair accessibility guidelines, but the height makes the surface more comfortable for anyone working seated for any length of time. Two inches is the difference between a kitchen that serves one posture and one that serves both.
A lowered prep zone requires coordination between the cabinet layout and the structural support beneath it. The decision has to be made before cabinets are built. A standard counter height that goes in first is expensive to change after.
Task lighting under cabinets is not optional. Overhead fixtures cast the user's own shadow onto the counter. The work surface is the most important place to see clearly and also the most shadowed in most kitchens. Under-cabinet lighting eliminates that shadow at the point of work. As eyes age, the difference between adequate and insufficient task lighting at the counter becomes the difference between safe food preparation and a real hazard.
A contrasting countertop edge can improve visibility at the work surface boundary, useful when someone is moving quickly, carrying something, or has reduced visual acuity. Aesthetic preference should lead here. It's a consideration worth knowing about, not a rule.
Storage & Access
Knee space roughed in at one location, even if enclosed now. Knee space allows someone to work at the counter seated, whether by choice or necessity. The need for it often arrives gradually and without warning. A kitchen that can accommodate a seated user without modification is a fundamentally more flexible kitchen.
FINISH UNDERNEATH CASEWORK
It's also the most commonly skipped detail in kitchen renovations. The framing is simple. The reason it gets skipped is that it requires a decision before cabinets are ordered, and most kitchen conversations happen at the cabinet selection stage, not the framing stage.
Pullout shelving in lower cabinets. Standard lower cabinets require bending and reaching to the back of a deep shelf, a motion that becomes difficult and then impossible for many people over time. Pullout shelving brings the contents forward. It's one of the few details in this guide that makes the kitchen better for everyone regardless of age or ability.
Upper shelving should be avoided or replaced with pull-down hardware where it exists. Reaching overhead becomes difficult and then unsafe over time, particularly when carrying weight. Pull-down hardware brings the shelf to a reachable height without requiring overhead reach. The kitchen shouldn't require a step stool to function.
Hardware & Fixtures
D-pull or bar hardware throughout. Knobs and small pulls require grip and pinch strength. A D-pull or bar handle operates with an open hand or a few fingers. Bar hardware is standard in most well-designed kitchens regardless of accessibility considerations. This is a specification that costs nothing extra and serves everyone better.
Lever faucet, single handle, high arc. A two-handle faucet requires fine motor control to balance temperature, which becomes difficult with reduced dexterity. A single lever adjusts temperature and flow in one motion. High arc creates clearance for filling large pots and washing without precise positioning. Each specification reduces the physical demand of a task performed dozens of times a day.
Retractable door hardware where clearance matters. A standard cabinet door swings into the kitchen when open, reducing the usable floor space in front of it. In a kitchen designed for accessibility, that swing can block the path of a wheelchair or walker entirely. Retractable hardware allows the door panel to pocket parallel to the cabinet face. The opening stays clear, the path stays open, and the kitchen looks no different when the doors are closed. Sugatsune, Hettich, and Hafele all make well-regarded systems.
Appliances
Side-swing or French-door ovens over below-counter drawer models. A drawer oven requires bending to retrieve hot items from a low position. It's a genuine safety risk, not a minor inconvenience. A side-swing or French-door oven keeps the door out of the work path and allows the user to stand close to the opening.
French-door or counter-depth refrigerator over top-freezer. A top-freezer puts the most-used compartment at the least accessible height. French door puts it at standing height where it's used most.
Draw the appliance swings on the plan before anything is ordered. Appliance doors interact with each other, with island corners, and with the person using them. These conflicts are invisible on a plan that doesn't show them. By the time they appear on site, the cabinets are already ordered.

SYSTEMS
How a home connects its rooms is as important as what's in them. Hallways, stairs, thresholds, and flooring are the infrastructure of daily movement, and they're almost always designed to minimum standards rather than good ones.
IAQ (HRV, AIR SEALING, RADIANT FLOORS)
LIGHTING
ELECTRICALLY OPERATED WINDOWS AND BLINDS
FIRE SPRINKLERS
HOME SECURITY and AI SENSORS
LEAK DETECTION ETC.
Hallway width is one of those decisions that feels abstract during design and becomes very concrete the first time you try to move a piece of furniture, navigate with a stroller, or simply walk through your own home without the corridor feeling like a constraint. Thirty-six inches is the minimum worth designing for. At that width a wheelchair passes without wall contact and a mobility aid user can move freely rather than carefully. Forty-two inches is the more generous standard, and it shows. Wider hallways open up storage options along the wall and give a home a sense of openness that narrow corridors never have. The width isn't about wheelchairs specifically. It's about whether the home has enough room to live in comfortably, which matters long before a mobility aid enters the picture.
Getting this right costs nothing in new construction. In a finished home it means moving walls. Most existing homes fall short not because it's difficult to achieve but because it was never asked for at the design stage. Hallway widths are set during framing and rarely questioned until furniture moves in. By then the wall is finished on both sides.
Level changes and raised thresholds are worth eliminating wherever the plan allows. The reason they're dangerous isn't that they're large. It's that people stop seeing what they've always navigated around. Familiarity is part of the risk. A threshold that's been there for twenty years is invisible right up until it isn't. The ADA sets a useful benchmark: a maximum of half an inch in new construction, beveled above a quarter inch. Flush transitions remove the hazard rather than asking people to remember it's there.
Stairs
Stairs need continuous handrails on both sides, returned at the top and bottom. A handrail that ends at the newel post leaves someone unsupported at exactly the wrong moment, stepping onto or off the stair, which is when most stair falls happen. Returning the rail means support exists through the full transition. Continuous on both sides means a person can use whichever hand is stronger or more reliable on any given day.
Contrasting nosings on every stair tread. The leading edge is where depth perception matters most. In low light or with reduced vision, a uniform stair surface makes it genuinely difficult to judge where one tread ends and the next begins. A contrasting nosing gives the eye a reference point at exactly the moment it needs one. It's a finish decision that costs almost nothing and does real safety work.
Three-way switching on all hall and stair lighting. The terminology is confusing — three-way switching means two switches that operate the same light, one at each end of the hall or stair. A single switch means someone navigates in the dark from the wrong end. It's a small decision that gets made once and lives with the house forever. It also requires the electrician to know the plan before rough-in. Miss it then and adding it later means opening walls.
Flooring
Flooring throughout should prioritize traction and low reflectance. The right specification depends on the material:
Carpet: low pile
Wood: avoid glossy finishes
Tile: specify non-slip
High-gloss floors reflect light from above and create visual confusion about surface depth and wetness. An older eye has more difficulty filtering that reflected glare, which affects both balance and confidence. Reduced confidence in footing changes how people move — shorter steps, slower pace, more reliance on walls. The floor finish is doing more behavioral work than most people realize.
The bedroom-to-bathroom path deserves its own thought. It's traveled half-asleep, often without glasses, in low light, by someone whose balance is least reliable in the first minutes after waking. Every design friction on that path — a threshold, a turn, a poorly placed door — compounds at exactly the moment the person navigating it is least equipped to manage it. More on this in the bedroom section below.
THE FINISH LAYER
Every decision in this section sits on top of everything that came before it. These aren't structural choices or systems decisions. They're what gets touched and operated every day. But some of them only work if earlier decisions were made correctly. Rocker switches depend on three-way switching being planned during the circulation stage. Night path lighting depends on the bedroom-to-bathroom path being short and direct. The finish layer completes the home. It doesn't compensate for what wasn't designed into it.
Hardware & Finishes
Lever handles on every door in the house, interior and exterior. The case for levers on exterior doors was made in the entries section. The same logic applies everywhere inside. Grip and rotation become unreliable earlier than most people expect, and interior doors are used dozens of times a day. Cabinet hardware follows the same principle. A D-pull or bar handle operates with an open hand or a few fingers. Almost no grip required.
Rocker switches over toggle throughout. A toggle switch is a small target that requires precise contact to operate. A rocker switch responds to any contact across a much larger surface — palm, knuckle, elbow. In low light or with reduced dexterity the difference is real and immediate. A rocker is also easier to read at a glance. The position of a toggle tells you little without looking closely. A rocker's state is visible from across the room. For this to work correctly, three-way switching has to be planned during the circulation stage. Get that right and rocker switches complete the system.
Consistent flooring and flush transitions throughout the home. Flooring transitions are among the most common trip hazards in a residence, not because they're large obstacles but because they're inconsistent. The foot expects a flat surface and encounters a small ridge. That mismatch is what causes falls, not the height of the transition itself. Consistent flooring removes the mismatch entirely.
Avoid high-gloss floor finishes. High-gloss is specified for appearance. In practice it creates glare at eye level and reduces traction underfoot. Both problems compound over time and neither announces itself until it matters.
Contrasting hardware and switch plates throughout. As vision changes, the ability to locate small objects against similar backgrounds decreases. A switch plate that matches the wall becomes effectively invisible. Contrasting hardware means the things a person needs to find quickly — handles, switches, plates — are visible without effort. It's a specification that costs nothing and pays quietly over time.
Lighting
A single overhead fixture is the default in most rooms and one of the worst solutions for a home designed to work across every stage of life. It creates one bright zone and leaves everything else in relative shadow. Layered lighting — ambient, task, and accent — means the room can be adjusted for what's actually happening in it. Bright at the counter for food preparation, warm at the table for conversation, minimal at night for navigation. Each layer serves a different need and no single fixture can serve all three.
Color temperature is a functional decision, not just an aesthetic one. Older eyes need higher color temperatures to maintain contrast and reduce eye strain. For task areas — reading, cooking, grooming — the range that makes a meaningful difference is 3500 to 4000 Kelvin. For living and sleeping spaces at night, warmer tones in the 2700 to 3000 Kelvin range support rest. The goal isn't a fixed setting for every moment. It's the flexibility to vary color temperature across time of day and task. That's what tunable white fixtures and dimmer-controlled zones actually deliver.
Most lighting plans are designed for a forty-year-old's eyes. Aging eyes need significantly more light to perform the same task, and the difference isn't subtle. A space that feels well-lit at fifty can feel dim and fatiguing at seventy. Plan for more lumens than seems necessary.
Tunable white or dimmer-controlled zones give the home flexibility that fixed lighting cannot. A home's lighting needs change by time of day, by season, and as the people living in it age. Fixed lighting is a compromise that serves none of those moments particularly well. Tunable white and dimmer zones mean the home can be bright and cool for morning tasks and warm and dim for the evening without changing a single fixture. Lutron Caséta handles dimming and zoning well at a range of budgets. Ketra is the high-end option for full tunable white. For a more accessible path, fixtures that accept tunable bulbs can achieve a similar effect without a full system installation.
Night path lighting from the bedroom to the bathroom is the highest priority lighting decision in the guide. Most falls in the home happen at night, on the way to the bathroom, half-asleep — and most renovation lighting plans don't address this at all. Footlights illuminate the floor plane without flooding the room with light. They guide without waking. Whether footlights are hardwired or plug-in motion sensors, the goal is the same: the path from bed to bathroom should never require someone to navigate in the dark. Whether that path is short and direct is a decision made in circulation and bedroom layout, not here.
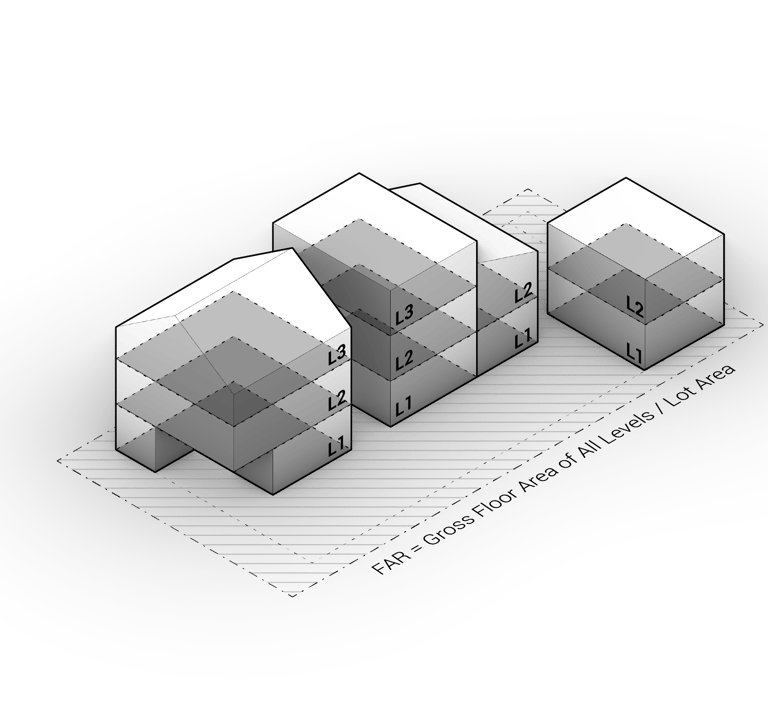
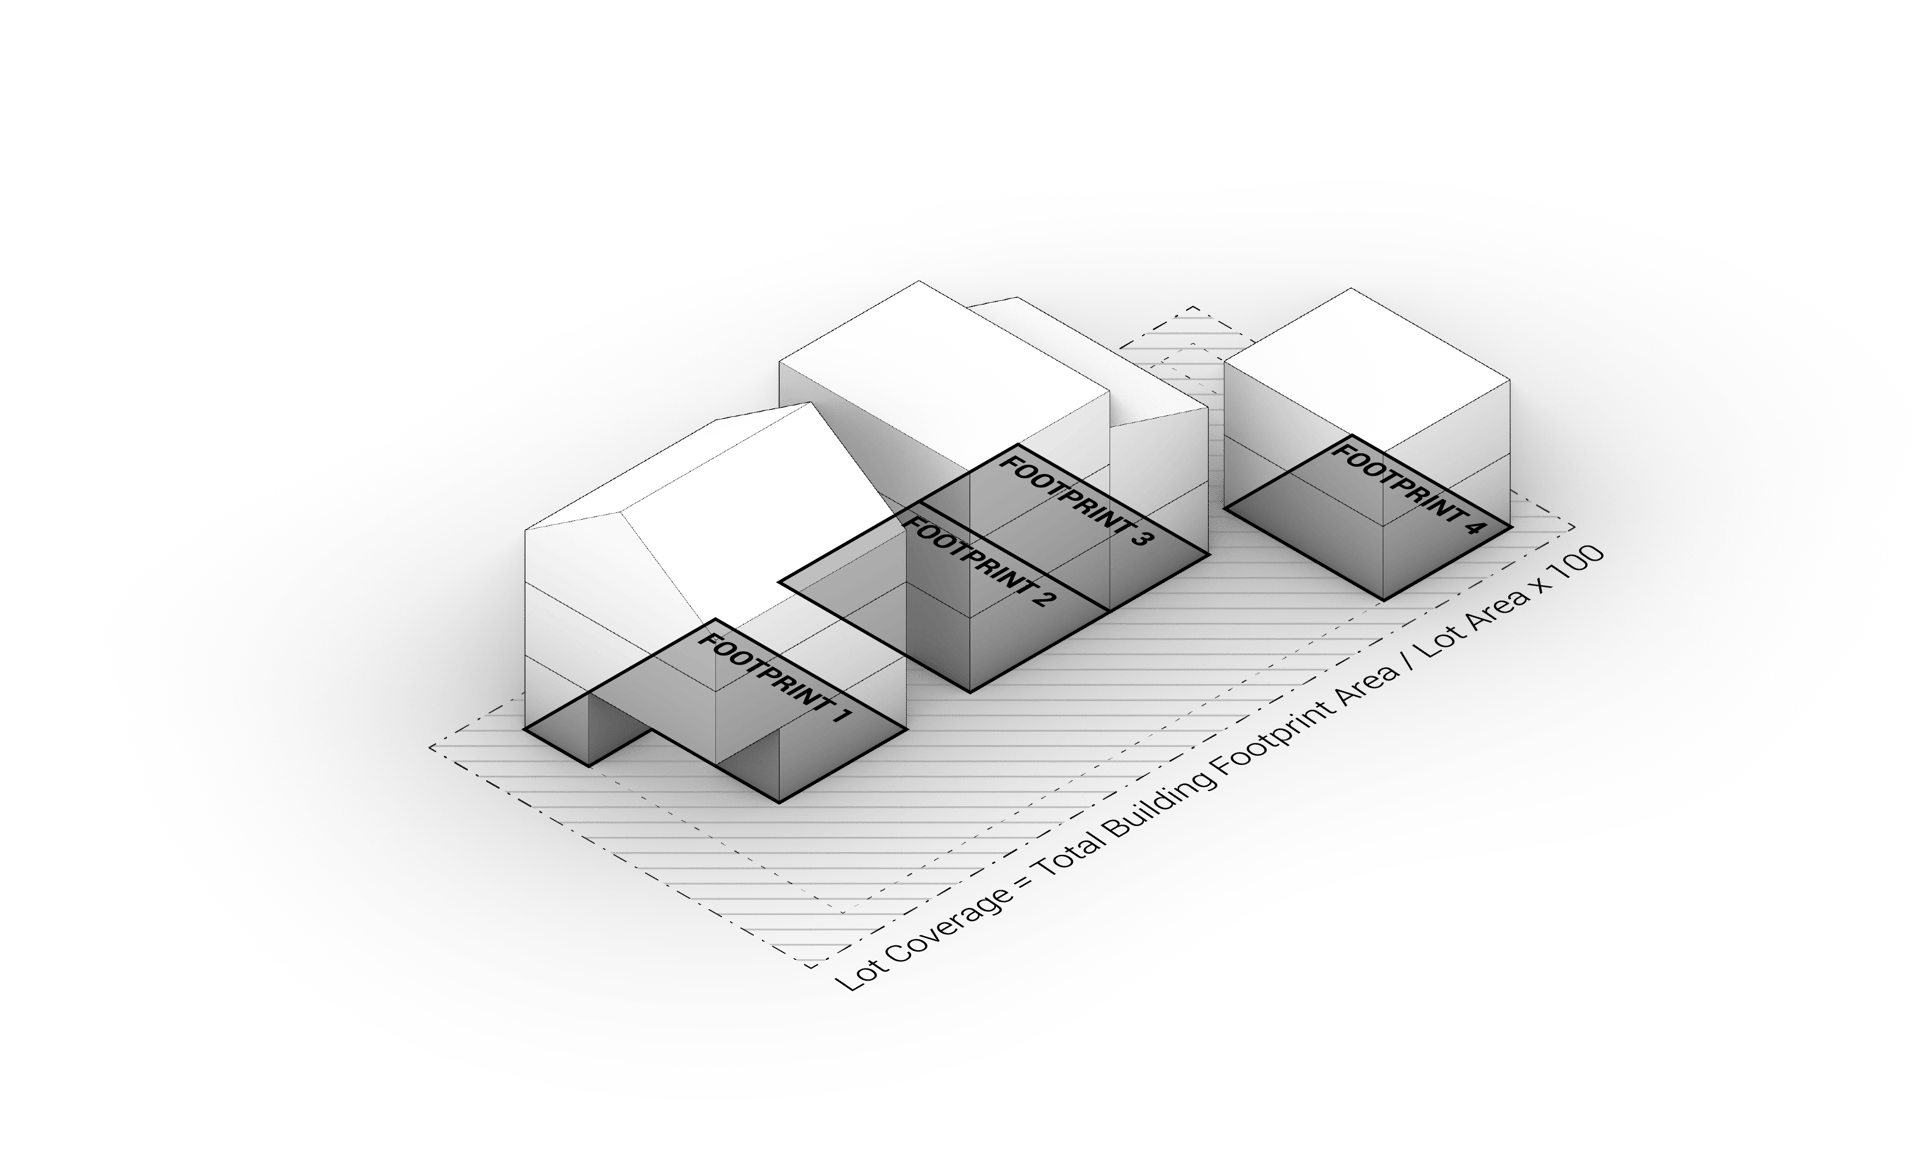
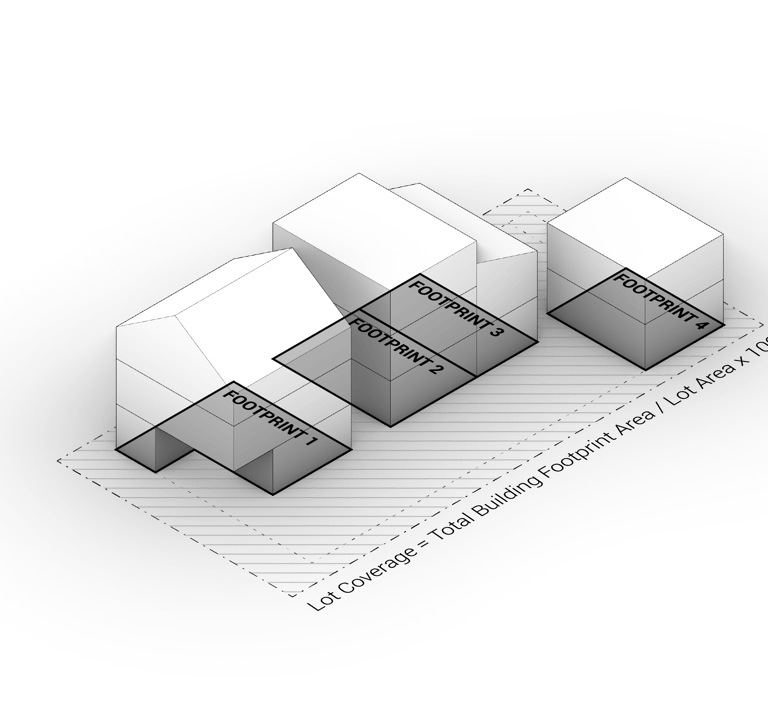
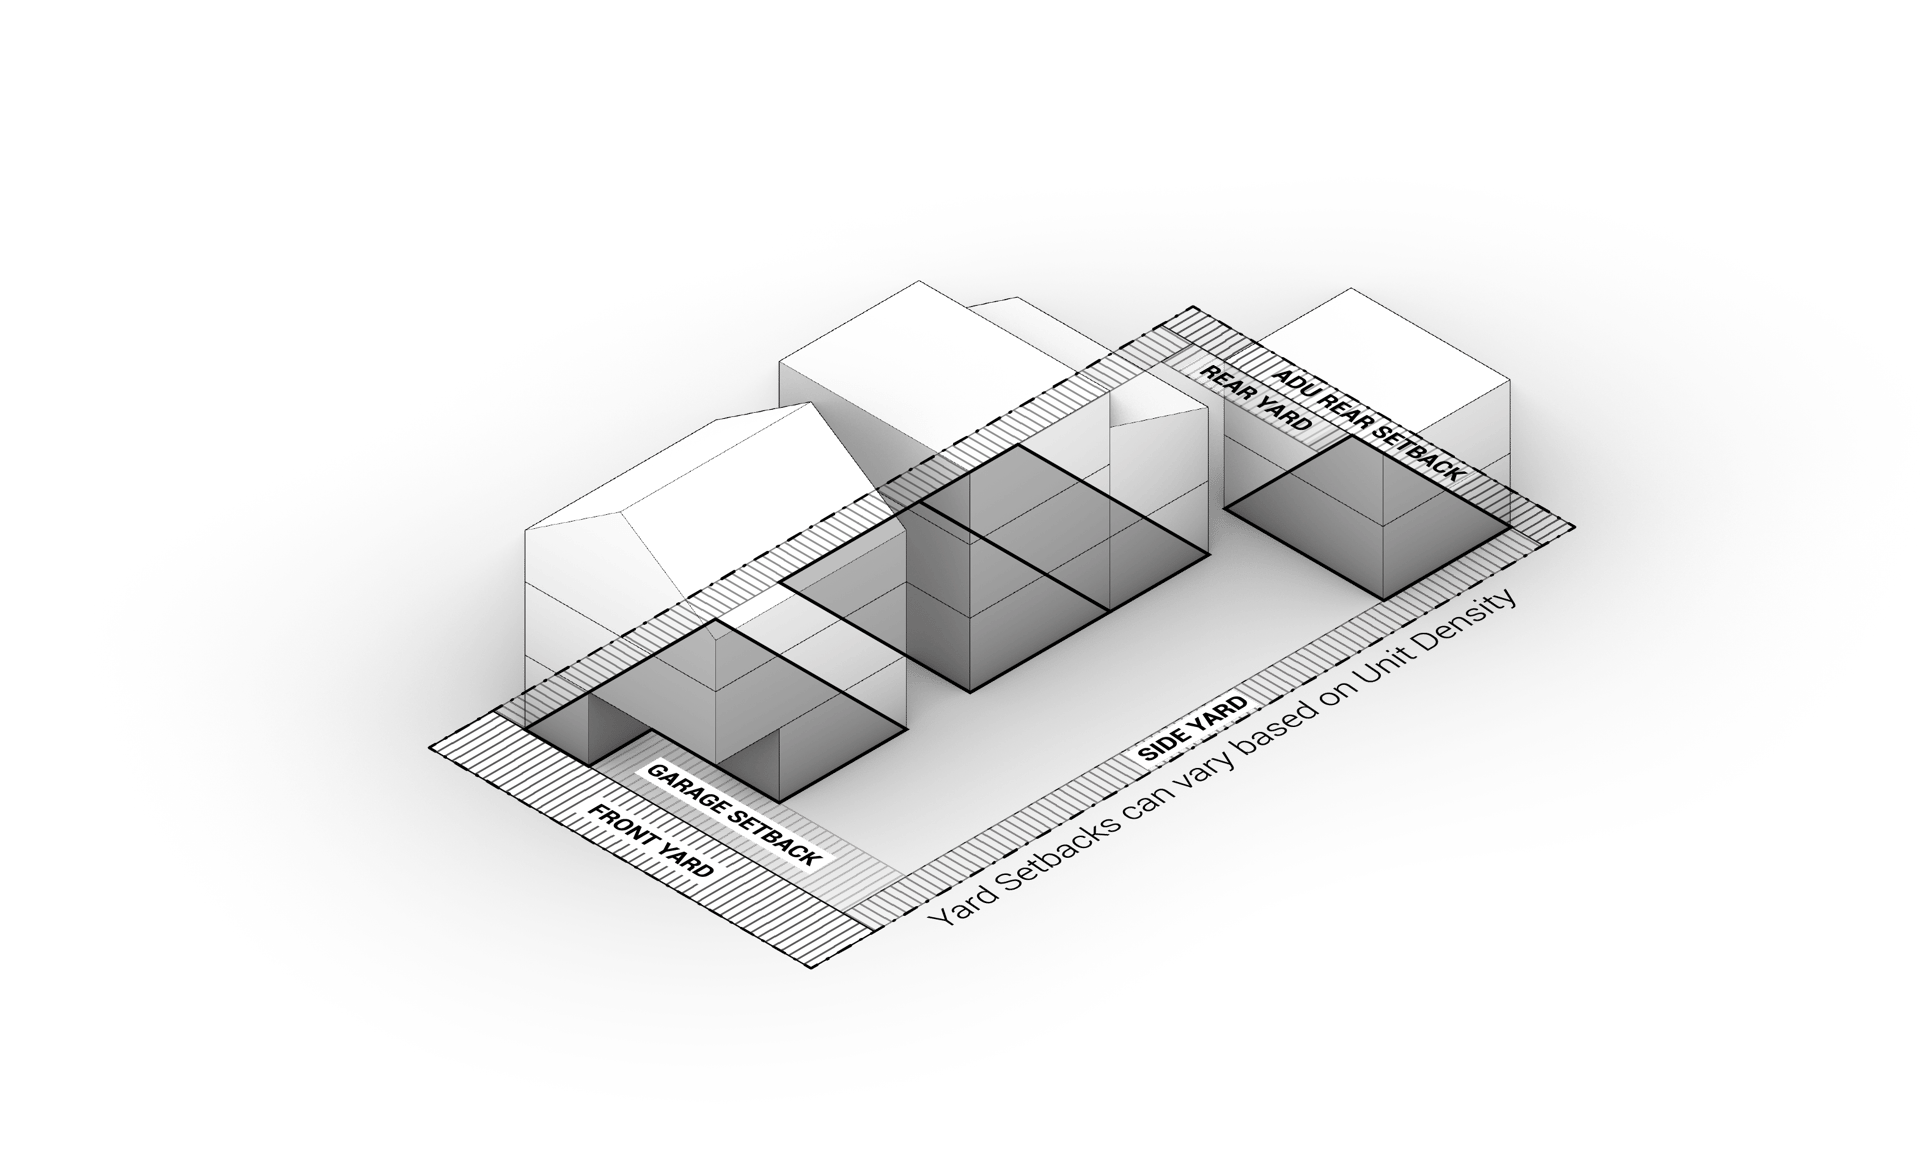
(Disclaimer: This summary is intended as a general reference only. Zoning regulations are highly site specific and there may be other parameters not listed here that apply to your lot. We recommend working with an experienced architect to flag constraints and identify opportunities. You can schedule a free 15-minute consultation to discuss the possibilities for your site below.)